Hello Everyone
Rahul O M
We are gona learn how to create an app using mit app inventer and also we will create an chatting app.
so, What is Mit-app inventer?
App Inventor
is a free, simple. online tool that allows the user to create a new app for
android devices .
There is no
coding required for building the apps using App Inventor Only two things are
required. Google account and an android Smartphone.
Building an app using app inventor
step 1 : Go to the website http: //ai2.appinventor.mit edu/
step 2: Login to the Google account by providing the user name
and password .
step 3 . Click on New Project at the top right corner of the
window .
step 4: Provide a relevant project title for the app to be
created
Step 5 : you will get a designer window, where the components
and layout of the app can be created.
Step 6: Click on button and drag it over the viewers and drop
it .
step 7 : Connect the computer with an android mobile or tablet
. This will help you to build your app on the computer and test it in real time
using
· Follow the instructions given below
to connect the computer and mobile
· Download and install MIT AI2
companion app on your phone
· Connect your computer and mobile to
same wifi network
· Choose `connect` `AI Companion` from
the top menu in the ai2 browser
· A dialogue with a QR (quick response)
code will appear. Then click the `scan QR Code`.
· Now, your phone is real time connected to the App Inventor
S So, using these above steps you can create a simple app in mit app inventer.
Now we will create an chatting app with mit-app inventer
The name of the app is :
App name: CLOUDDB Chatting App
This is an app that can be used for chatting
with other person , it saves the chats using the cloudDB software.
Steps to create the app
· In the Designer, add the following components:
· Label, Horizontal Arrangement, Text Box, Button, List View,
CloudDB
· Change the property as shown below
· Your
Viewer to look similar to the image below.

Click on blocks at top right
and Initalize three variables, as follows:
- username :
stored when user logs in
- joined : boolean
that is true once user logs in
- chat List :
stores all chat messages in a list
· When the user presses
the Submit button, they are either entering their name to join the chat, or
actually typing in a chat message. You'll check first whether they already
joined the chat or not.
· You will be saving
those messages to CloudDB, the
"Cloud Database". You will append the new message to the chat list
already stored in CloudDB.
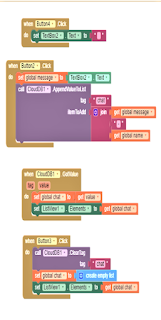
· Drag and drop the
code blocks to build the app as shown in the the below image


That is it! Now it's time to test!
The best way to test an app using CloudDB and
multiple users, is to use multiple devices. The MIT AI2 Companion does not
always allow for mutiple users to connect at the same time, so the better
option is to build the apk, and install your app on more than one mobile
device.
From the Build menu, choose "Android App
(.apk)". Once the apk is built, scan the generated QR code, and install
the apk on multiple devices. Then send a message from each device. All messages
should appear on all devices

You can
see the outut/ the app working perfectly and the chats are saved in clouddb and
also displayed with the messager name saved
The project is
successful and you app is ready to publish😎
Thanks for visiting my blog
Comments
Post a Comment